Showing posts with label AAR. Show all posts

Sunday, July 22, 2012

On To Richmond: Seven Pines

The scenario for this week's foray into 1862 returns to a more historical situation with General Johnston's attack on Seven Pines.  This is a small 2 turn tournament scenario which requires the South to attack east out of Richmond toward the better part of two Union Corps and pick up points by occupying Seven Pines, Fair Oaks and Savage's Station, and the bridge crossings over the Chickahominy.  Again I take the North and Mike L. the South. 
Dawn of May 31, 1862: Battle of Seven Pines
Turn 1: May 31, 1862
The day opens with rain as mandated by the scenario rules.  DH Hill moves up and attacks the Union positions around Seven Pines without breaking the line.  The Union reinforcements manage to cross the bridges of the swollen Chickahominy and stabilize the front.  Longstreet moves up and manages to push Casey back, but the Union army ends the day with a solid defense along the Seven Pines/Fair Oaks line.
Dawn of June 1, 1862

Turn 2: June 1, 1862
The South begins with attacks along the Union line.  Mike's corps assault and grand assault rolls fail to bring in the needed number of divisions to gain a decisive coordinated attack.  DH Hill and Smith exhaust their units attempting to breech the Union defenses.  In shame, Gen. Johnston throws himself under a Union wagon train.  That leaves "Old Pete" Longstreet, with his last intact Southern formation, to lead the army to victory.  Longstreet points his sword at Seven Pines and says "Roll a 6" and bang...the dreaded 6-1 dice combo slams into the Union III Corps.  "Do it again" says Longstreet of Fair Oaks Station and the Union line melts away.  The North reforms on Savage's Station, this single hex holding the victory points that will spell victory or defeat.  Longstreet is up to the challange and crashes into the considerable Nothern defenses.  Savage's Station falls and Longstreet has saved the day with a Confederate Marginal Victory. 
Night of June 1, 1862: Longstreet holds the field at Savage's Station

Monday, July 9, 2012

On To Richmond: The Gates Of Richmond

The 1862 campaign continued over several sessions during the month of June.  This time we went with the larger seven turn Gates Of Richmond scenario; once again settling into our now familiar roles with Mike L. taking the South and I the North.  This scenario is one of the most intriguing of the game, offering the central hypothetical of the entire campaign: what if McDowell had been allowed to march to Richmond and reinforce McClellan's army.  The system showcases the less unified early war command structures of both sides with typical corps formations containing no more than 2 divisions.  This makes for a very compelling chess-like game with small scale unit activations switching back and forth as each side attempts to gain advantage.
Gates Of Richmond Setup - Morning May 26, 1862
The situation opens with the Army of Potomac straddling the Chickahominy River ready to advance on several different avenues of attack.  The North is awarded points for occupying various important terrain features in the region: railway stations heading NW toward the Shenandoah valley, the defensive redoubt system surrounding the city, the forts guarding the southern approaches along the York River, and finally the city of Richmond itself.  The Confederates earn points, naturally, by preventing this occupation, but also by denying the Union access to its supply line along the railroad back to White House Station on the Pamunkey River. 
Night of May 27, 1862

Turns 1 and 2: May 26-27
I opted to try for a move on Richmond by crossing the Chickahominy north and wheeling around to approach the city from northwest.  This would put me closer to McDowell's marching forces and put me in a postion to push into the unoccupied redoubts in this sector of the Southern defense.  However, this strategy would come at the cost of uncovering my supply line to White House Station.  I was willing to take the risk and see how much strength Mike was willing to commit to take the rail line.  The first day the forces started slowly turning toward the western side of the city.  Day 2 saw rain which slowed everyone to a crawl as the units kept moving in the direction of the plan.  By the end of the day the North had everyone on the North bank of the Chickahominy and the South sent a force toward the supply line.  In the west, the Northern cavalry was able to push into the redoubt line before the South could adequately react. 

Night of May 30, 1862

Turns 3-5: May 28-30
The morning of May 28 found the Union army ready for action as they won a series of activations that marched the balance of two Corps into the western portion of the city itself and crossing over the river into Manchester.  The South positioned to counter-attack the next day.  May 29 was rain again which slowed all operations on both sides.  On May 30 the South launched their attacks which forced back the North from several hexes of the city and out of Manchester, but they could not move the units dug in around the President's House and Hollywood Cemetary.  Longstreet sent a division up the Union supply line which threatened White House Station.
Night of June 1, 1862: The Union holds West Richmond among the blood of Fatigue 4's

Turns 6-7: May 31-June 1, 1862
Turn 6 opened once again with rain.  Along the northern approaches, McDowell and AP Hill slowly made their way to the city battle, but effectively rendered each other hors de combat with their own battles NW of the city.  In the east, Longstreet's division took White House Station.  In response, Sumner sent a division to retake the supply line.  Turn 7 opened with renewed assaults by the South to dislodge the North from Richmond.  After several massive assaults they managed to push Franklin from the President's House, but at a considerable body count.  McClellan managed to hold onto the Public Square and Hollywood Cemetary.  At this point the game came down to who would control White House Station on the Union Supply Line.  Could Longstreet hold against Sumner's race to the river?  The point spread was so narrow that the outcome of this attack would declare the victor.  The final odds for the attack were close so we rolled the dice and the devastating 6 and 1 die roll combination came up in the North's favor!  A win for the North. 


Thursday, June 7, 2012

On To Richmond: Johnston's Retreat

The next scenario in our continuing series from the 1862 campaign is Johnston's Retreat.  Mike L. took the part of Gen. Johnston, while I put on my McClellan hat.  Here the Confederate army is attempting to slip out of the Warwick River defense line and retreat west to a consolidated line closer to Richmond.  The South gains points for each infantry, artillery and supply wagon train unit that marches to the designated western counties.  The North is charged with slowing down the retreat and inflicting damage on the slow moving wagon trains.  To aid in this task the Union is given a limited amphibious movement capability that will let them slip infantry units behind the Southern retreat path along the York River. 
Setup: Morning of May 4, 1862
Day 1: May 4, 1862
The day opens with the Confederate army already marching west, leaving Stuart's cavalry to screen the Warwick River line.  The morning opens with rain, slowing down operations on both sides.  Mike pushes his army as hard has he can to put some distance between us.  I march into the redoubts of the Warwick line and Stuart's cav manages to slow us down and fall back.  The rain reduces our movement to a crawl as we do a broad front push up the peninsula.  The navy fails to pick up any Union infantry.

Morning of May 5, 1862
Day 2: May 5, 1862
The weather clears up and the Southern commander takes up a position along the Cub Dam Creek redoubt line.  I follow up with a central pinning force and a Corps threatening each flank of the Confederate position.  One Union division under Franklin is transported up the York River and drops off in the area of Eltham Landing.  Mike breaks off a few divisons and races them NW to protect the rear lines and the wagon trains.

Morning of May 6, 1862
Day 3: May 6, 1862
Rain once again slows down operations in the field.  The Union northern flanking force manages to slip around the redoubt line but fails to make any significant headway.   The southern flanking force is slowed by the rain and Longstreet's timely counterattacks.  The navy fails to transport any new troops to reinforce Franklin's force and is bottled up by Hood. 

Morning of May 7, 1862
  Day 4: May 7, 1862
The rain stops and the Union renews its attacks along the Cub Dam line.  Several assaults manage to take the line with heavy losses on both sides but fail to slow the Confederate retreat.  The majority of southern units manage to pull back closer to the objective counties to the west.  One more division under Sykes does manage to get transported to the area of Bailey's Landing.

Morning of May 8, 1862
Day 5: May 8, 1862
The final day of operations find the Confederates poised to march most of their units into the victory objectives.  All looks lost for the Union cause as the South wins several activations allowing for a complete retreat to New Kent County.  However, Sykes manages to get two activations that allow him to slip past the Confederate pickets and raid the wagon train line, inflicting serious damage.  Sykes actions save the day for the Union resulting in a Marginal Union Victory.

Night of May 8, 1862


Friday, May 11, 2012

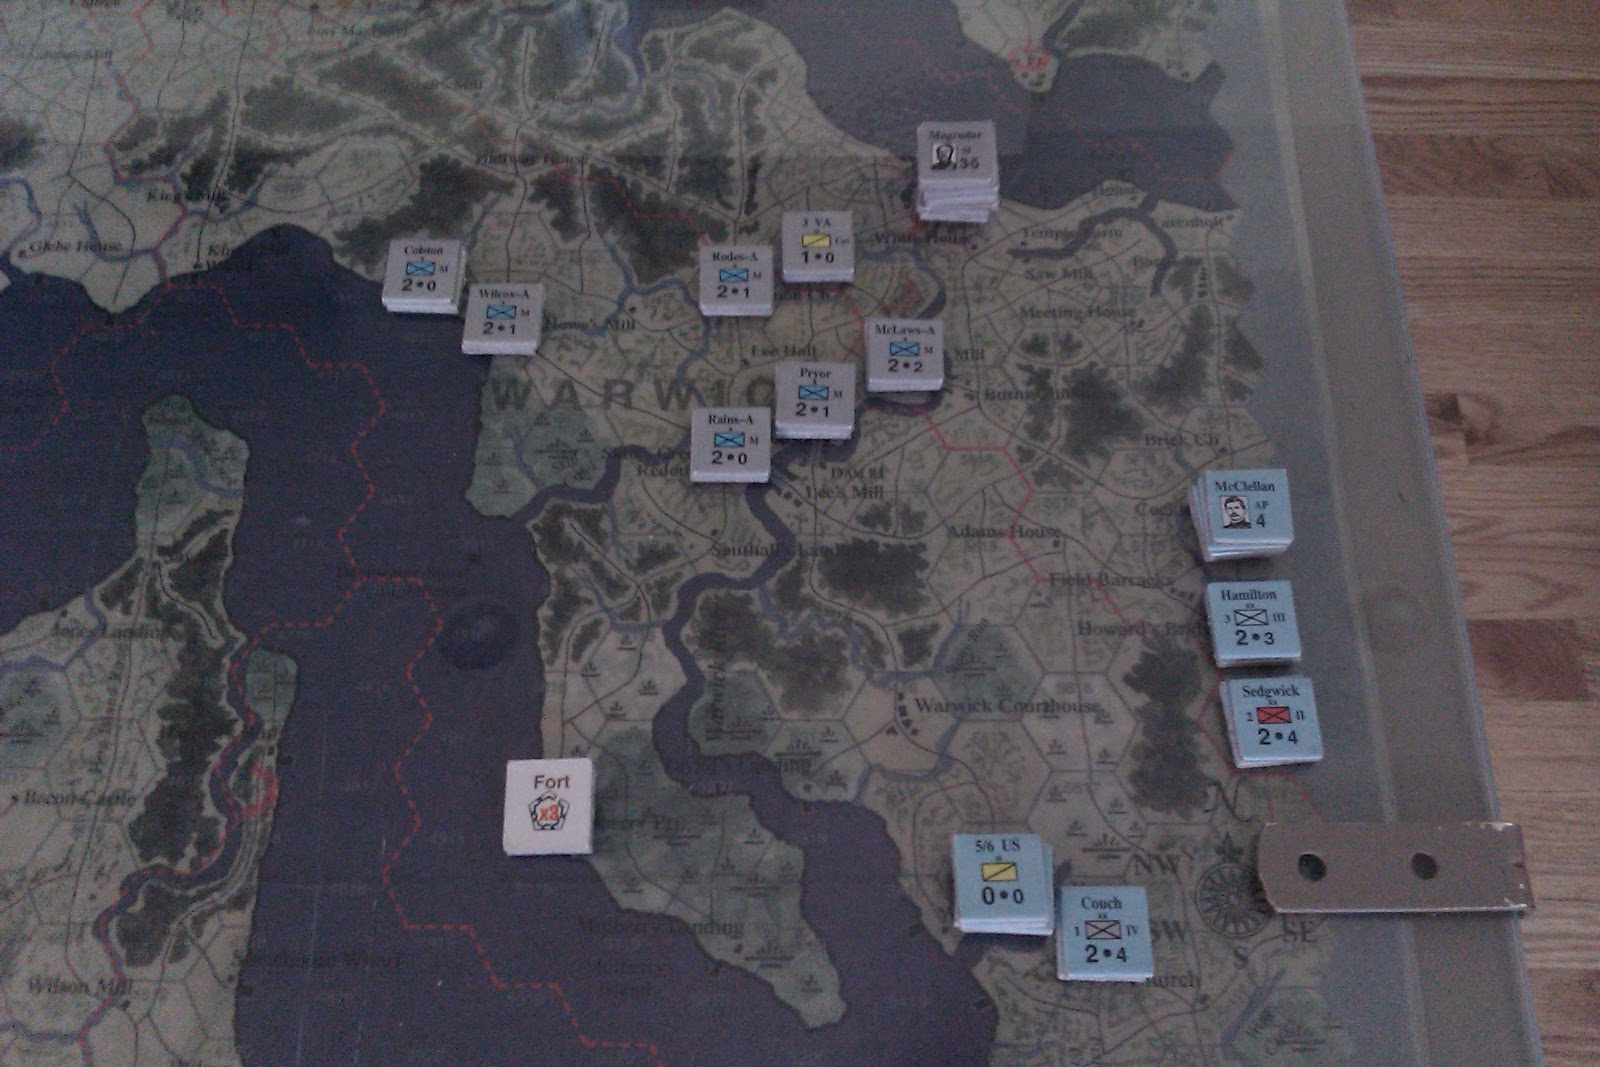
On To Richmond: The Warwick Line


Today marked the beginning of our official 1862 campaign season commemorating the 150th anniversary of the American Civil War.  Mike L. and myself are planning on working our way through On to Richmond and Stonewall in the Valley over the next few months.   We started right at the beginning of On To Richmond with Scenario 1: The Warwick Line.  This scenario supposes that McClellan acted against form and pushed hard against Magruder's river defense line far down the Peninsula in early April 1862.  The Union is given 3 days of clear weather to break into the Confederate lines and clear out the various forts and redoubts.  We selected sides randomly and I drew the South.
Opening Positions

Mike opened on the first day by pushing toward White House and breaking into the redoubt line around the Wynn's Mill location.  Limited Confederate counterattacks managed to prevent any further attacks along the line.  Day two saw the North push farther south down the redoubt line but were held up at Monson House and were blocked from any moves west by growing Southern reinforcements.  Day 3 saw the north clear the redoubt line all the way to Skill's Creek to the south but without strength to push on to Mulberry Pt.  The balance of the Union army concentrated on Yorktown but were thwarted by Magruder's stalwart defenders, winning a combination of five separate Union assaults.  While the Union army did manage to clear the redoubt line, they took far too many casualties, nearly a 3:1 ratio, which resulted in a Decisive Victory for the South.
Final Positions

Monday, April 18, 2011

AAR: Victory In The Pacific

As rewarding as it to introduce new players to the hobby, it is with equal satisfaction to reintroduce players who have been absent for a long time to the current gaming scene.  I was recently able to demonstate to my friend Roger M. of California the flexibility and ease of using VASSAL (http://www.vassalengine.org/) for long distance play.  Roger has not been playing for some time so we thought we would start with something classic: Avalon Hill's Victory In The Pacific.  Here is a quick report on our game.

Victory In The Pacific
8 Turn Standard Game
VASSAL PBEM - February-April 2011
Japan: Michael R.
US: Roger M.

Turn 1 - December 1941
My Japanese plan was a standard push for Hawaii with a maximum Pearl Harbor raid force.  The results of the Dec. 7 air raid were quite exceptional with 6 of the 10 ships in port sunk. 

Turn 2 - May 1942
I continuted my drive toward Hawaii and Samoa while supporting Indonesia with only land based air power.  The British were able to take advantage of this by forcing out the Japanese Bettys, but US carrier forces took a beating.  The pivotal event was Japanese control of the Coral Sea and US Madate sea lanes at the end of the turn, preventing significant US power projection into Hawaii for turn 3.    

Turn 3 - September 1942
I was planning for a double invasion of Hawaii and Samoa this turn but sent an understrength force to US Mandate.  I was getting ahead of myself thinking I would be able to support them with Bettys.  Hawaii fell to Japan, but at the expense of trading away Saigon to the British.  The Japanese sub won the Order of the Rising Sun for sinking two carriers in a row.

Turn 4 - January 1943
Japan concentrated on securing US Madate to prevent the massive US fleet reinforcement due to arrive on Turn 6.  The US responded by projecting power into the sea lanes adjacent to Indonesia/Australia, but the point values were not significant enough to put a dent in the strong Japanese lead.

Turn 5 - June 1943
Japan moved to set up the invasion of Samoa.  The US had no choice but to respond by throwing every asset that could make it to the zone.  Japanese control of Hawaii and Samoa prevents the new US reinforcements coming from the West Coast.  The Japanese carrier air wings bested the US land based air units.  At this point the game was effectively over and the US sued for peace. 

I know Roger had fun while learning the interface for VASSAL.  Neither of us had played the game in a very long time, so it was a nice place to start and still a solid game to revisit.  Next time we are going to try a more recent release, Breakout: Normandy...wait...release date 1992??  Where has all the time gone!